nginx as a Reverse Proxy to Apache Tomcat
11 minutes
Tip using Ko-fi or Buy Me a Coffee
Why a proxy?
Apache’s Tomcat is a complex beast whose primary role is to render JavaServer Pages. While it can be configured to use and serve the modern web it’s often an unnecessarily complex procedure. By using a dedicated reverse-proxy server such as nginx it allows you to separate web applications from the task of web serving.
Use a solo instance of Tomcat?
Tomcat uses XML configuration files which have annoyingly strict syntax requirements. Break the syntax with a simple typo and Tomcat will refuse to load! A proxy setup in nginx requires very little reconfiguration of Tomcat. So you can offload all your site’s configurations onto nginx and leave Tomcat to handle the web application.
Tomcat can also be unreliable at web serving. I personally had all kinds of stability issues when using Tomcat with HTTPS. Speaking of which Tomcat uses the Java keystore for SSL certificates which is needlessly complicated.
Finally nginx will serve static files such as images, CSS, Javascript much faster than Tomcat. Plus it is a simpler task in nginx to tweak client browser settings such as compression, cache and protocol support.
Apache HTTP Server?
nginx proponents say it is faster and less resource intensive than HTTP Server. I find nginx is easier to use and configure plus it often has a quicker turnaround for the implementation of newer protocols.
The bad of nginx
My biggest gripe with nginx is the documentation which at best is inconstant. It’s separated into four products. The spartan nginx documentation page; the more professional Nginx Admin Guide and Tutorial that’s geared for paying Plus customers; an intimidating wiki that offers an endless collection of configuration snippets and best practises; and the rather unloved FAQ page.
Parts of the documentation can be obnoxious such as this gem from the commonly cited Pitfalls and Common Mistakes page that doesn’t endear new users to the product.
NEVER use 777. It might be one nifty number, but even in testing it’s a sign of having no clue what you’re doing.
I used a book to familiarise myself with nginx before hitting the online documentation. Nginx HTTP Server Second Edition from PACKT was a useful read but there are plenty of other great publications covering the product.
Install Tomcat
If you already have a working setup of Tomcat you can skip this part. The rest of this article will reference a clean install of Tomcat serving on port 8080.
Otherwise install Tomcat, either version 8 or 9 will do.
sudo apt-get install tomcat8
sudo service tomcat8 status
Make sure Tomcat is running.
sudo service tomcat8 start
Display the version installed.
/usr/share/tomcat8/bin/version.sh
Take note of your server’s hostname.
hostname
If no value is returned, use the -I option.
hostname -I
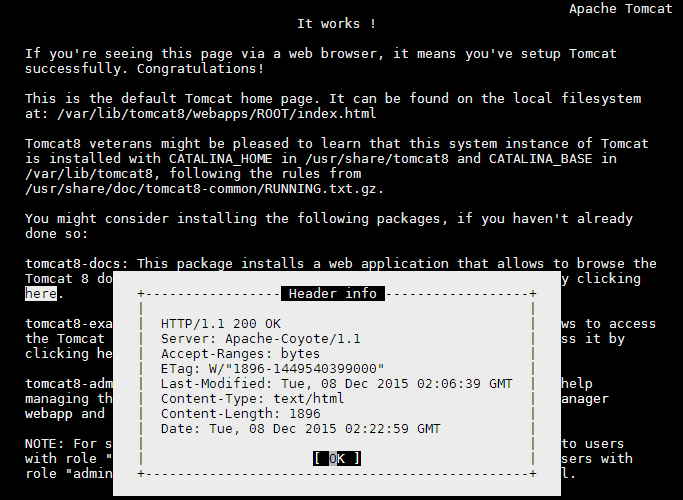
Install links and use it to test and view the Tomcat welcome page.
sudo apt-get install links
Make sure to replace ubuntu with the value returned from hostname.
links http://ubuntu:8080
Press the Q key to quit links.
Pinning the correct repository
There are two ways to install nginx, either using a package hosted on the Ubuntu software repository or on the nginx.org repository. Each package uses different configurations and paths so it is best not to mix the two.
The Ubuntu package uses a Ubuntu like configuration where it incorporates subdirectories such as sites-enabled, sites-disabled, snippets. But I it think it’s better to use the nginx.org hosted package as its paths and configurations are what the nginx reference materials use.
cd ~
wget http://nginx.org/keys/nginx_signing.key
sudo apt-key add nginx_signing.key
Discover and take note of the the Ubuntu codename.
$ lsb_release -sc

wily
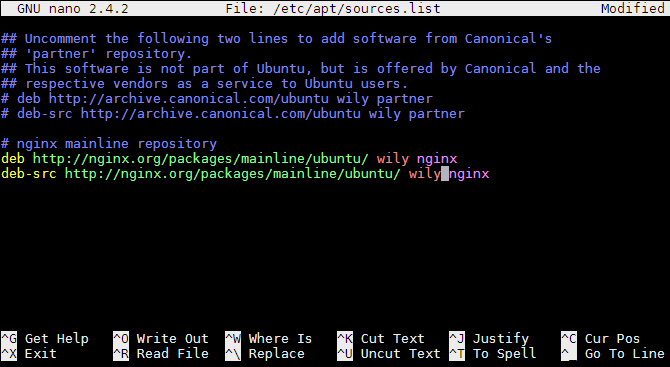
Then edit the apt sources list.
sudo nano /etc/apt/sources.list
Nginx has two branches of releases. The Stable branch and the Mainline branch. Despite the naming convention nginx recommends you deploy the Mainline branch over the Stable.
We recommend that in general you deploy the NGINX mainline branch at all times.
To use the Mainline, insert this snippet at the bottom of your sources.list.
Don’t forget to replace codename with your Ubuntu codename, ie: bionic for 18.04 LTS.
# nginx mainline repository
deb http://nginx.org/packages/mainline/ubuntu/ codename nginx
deb-src http://nginx.org/packages/mainline/ubuntu/ codename nginx
Save, exit and update your repositories.
sudo apt-get update
Unfortunately we now have a conflict with the package sources. Both nginx.org and the Ubuntu repositories offer a nginx package.
We need to create a policy to force apt to only use the nginx.org repository for the nginx package.
sudo nano /etc/apt/preferences.d/nginx
Add the following snippet and save the file.
Package: nginx
Pin: origin nginx.org
Pin-Priority: 900
You can learn more about Apt pinning at ubuntuusers.de and help.ubuntu.com.
Update apt.
sudo apt-get update
It should now only install the nginx packages sourced from nginx.org.
Install nginx
Let us install nginx.
sudo apt-get install nginx
Test for its version.
nginx -v
Then test the default configuration. Note nginx needs to be started using a root account, so this test should fail.
nginx -t
But this should pass.
sudo nginx -t
Make sure nginx is running.
sudo service nginx start
Test nginx’s web serving on port 80. Again don’t forget to replace ubuntu with the value returned from hostname.
links http://ubuntu

Basic proxy
With that all working we currently have two web sites being served. The Tomcat 8 welcome page hosted on port 8080 and the nginx welcome page on the default HTTP port 80. Both are being served by two different pieces of software.
By using a simple reverse-proxy configuration we will join nginx with Tomcat. Web browsers will connect to nginx on port 80 but instead of receiving the nginx welcome page. They will receive the welcome page served by Tomcat.
Disable the default nginx configuration.
cd /etc/nginx/conf.d/
sudo mv default.conf default.conf~
Create a new nginx configuration file.
sudo nano tomcat-proxy.conf
Add the following snippet.
server {
   listen 80;
   server_name example.com;
   location / {
     proxy_pass http://127.0.0.1:8080/;
   }
}
Save and exit. Then test your new configuration.
sudo nginx -t
If there are no problems, tell nginx to reload your new configuration.
sudo nginx -s reload
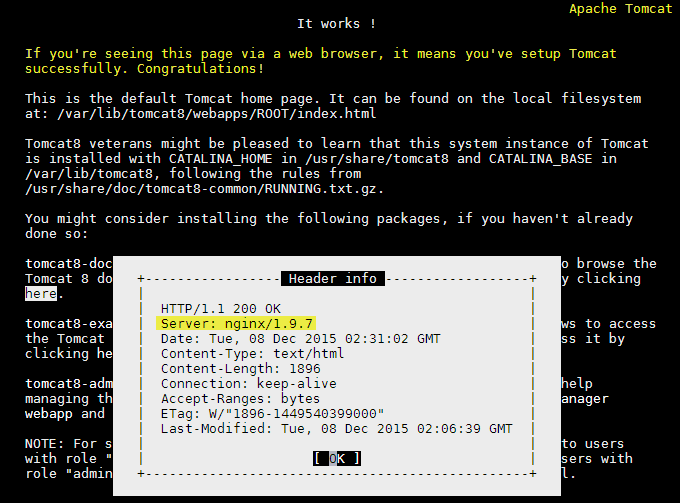
Finally test your changes in the links browser. You should see the Tomcat 8 welcome page despite being connected to nginx.
links http://ubuntu
Setup nginx to serve all static content
In the previous code nginx acted as a man in the middle. It passed on all HTTP requests from client browsers to Tomcat and vice versa. This is fine but it does underutilise the potential of nginx which offers better performance for serving static files.
So in this snippet we add some new directives to tell nginx to handle all client browser requests except for dynamic JSP files which will be processed by Tomcat. You could also use this technique to instead pass on files for other Java based languages such as Lucee/ColdFusion CFM or Groovy GSP.
sudo nano /etc/nginx/conf.d/tomcat-proxy.conf
Replace the content of the configuration with this snippet.
server {
  listen 80;
  server_name example.com;
  root /var/lib/tomcat8/webapps/ROOT/;
  index index.jsp index.html index.htm;
  location / {
    try_files $uri $uri/ =404;
  }
  location ~ \.jsp$ {
    proxy_pass http://127.0.0.1:8080;
  }
  location ~* \.(jpg|jpeg|png|gif|ico|css|js)$ {
    expires 1y;
  }
}
Save, test and reload and you’re done.
sudo nginx -t
sudo nginx -s reload
Some additions to note.
The location / {} directive now searches for the existence of files in the directory set in the root directive. If no file is found a HTTP 404 error is returned to the client browser. The root directive should be the same as the root path used by Tomcat.
The location ~\.jsp$ {} directive tells nginx to forward files with the extension .JSP to Tomcat. This means nginx will handle all other files requested by the client browser.
Finally the location ~* \.(jpg|jpeg|png|gif|ico|css|js)$ {} directive tells nginx to implement client browser caching for all files that match these extensions and to expire that cache after 1 month.
HTTPS
With free services such as the Let’s Encrypt from the Linux Foundation there are fewer reasons not to offer client browser encryption for your websites. As when compared to the Tomcat implementation, adding HTTPS support to nginx is a breeze. It uses standard CRT (binary DER or text based CER) certificates and only requires a few lines of modification to your configuration.
listen 80;
server_name example.com;
Is replaced with the following. Note don’t forget to replace your_server.crt and your_server.key with the actual names of your certificate and key files.
listen 80;
listen 443 ssl;
ssl_certificate /etc/ssl/your_server.crt;
ssl_certificate_key /etc/ssl/your_server.key;
server_name example.com;
SPDY and HTTP/2
One of the benefits of using nginx over Tomcat to handle client browser requests is its out of the box support of newer web protocols such as SPDY and HTTP/2.
Due to protocol incompatibilities nginx will either support SPDY or HTTP/2 but not both. nginx only supports HTTP/2 on version 1.9.5 or later. While nginx version 1.94 and earlier only supports SPDY. Most web browsers only allow HTTP/2 or SPDY support over a HTTPS connection.
To add HTTP/2 support to nginx 1.95+ append HTTP2 to the listen 443 SSL directive.
listen 443 ssl http2;
Or to add SPDY support to nginx <1.94 append SPDY to the listen 443 SSL directive.
listen 443 ssl spdy;
Save, test and restart.
sudo nginx -t
sudo service nginx restart
To test SPDY or HTTP/2 support in a browser many people find the HTTP/2 and SPDY indicators for Firefox and for Chrome useful.
Test install to this point.
Request Parameter Results
A common problem when implementing a reverse-proxy is that some parameters values returned by the request scope in a web application will be wrong.
To show a practical example create a new JSP.
sudo nano /var/lib/tomcat8/webapps/ROOT/test.jsp
Copy and paste the following JSP snippet, save and exit.
<html>
  <body>
   Request: <%= request.getRequestURI() %><br>
   Protocol: <%= request.getProtocol() %><br>
   <h4>Remote</h4>
   Host: <%= request.getRemoteHost() %><br>
   Address: <%= request.getRemoteAddr() %><br>
   Scheme: <%= request.getScheme() %><br>
  </body>
 </html>
View the saved JSP in a browser.
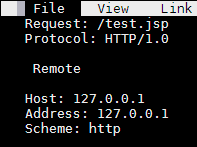
links http://ubuntu/test.jsp
Displayed is a number of commonly used request scope values except they are incorrect! Tomcat expects these values to originate from the client connection but in fact they are from the internal connection to nginx.
To correct this we need to set pass on the values obtained by nginx over to Tomcat using custom HTTP Headers.
sudo nano /etc/nginx/conf.d/tomcat-proxy.conf
Find the following location directive.
location ~ \.jsp$ {
   proxy_pass http://127.0.0.1:8080;
}
Replace it with the following.
location ~ \.jsp$ {
   proxy_pass http://127.0.0.1:8080;
   proxy_set_header Host $host;
   proxy_set_header X-Forwarded-For $proxy_add_x_forwarded_for;
   proxy_set_header X-Real-IP $remote_addr;
   proxy_set_header X-Forwarded-Proto $scheme;
}
Save, exit, test and reload.
sudo nginx -t
sudo nginx -s reload
links http://ubuntu/test.jsp
If you display the test.jsp after reloading nginx you will see there are no changes! As Tomcat hasn’t been told it’s behind a reverse-proxy and needs to change the source of some of its request values.
cd /etc/tomcat8/
sudo cp server.xml server.xml.original
sudo nano server.xml
If you’re using an unmodified server.xml configuration press
Ctrl+_+C and then type in
109 to go to said line.
Otherwise manually scroll down until you find the container.
<Engine name="Catalina" defaultHost="localhost">
Replace it with the following snippet.
<Engine name="Catalina" defaultHost="localhost">
    <Valve className="org.apache.catalina.valves.RemoteIpValve"
         internalProxies="127\.0\.[0-1]\.1"
         remoteIpHeader="x-forwarded-for"
         requestAttributesEnabled="true"
         protocolHeader="x-forwarded-proto"
         protocolHeaderHttpsValue="https"/>
This Value Component tells Tomcat to use the built-in Remote IP Valve feature to replace the remote host, address and scheme values.

Save, exit and restart Tomcat.
sudo service tomcat8 restart
Now if you point your desktop browser to /test.jsp you should see that the host, address and scheme are now correct.
Note using links http://localhost/test.jsp will not reflect these changes. As Tomcat will now associate a localhost request as one sourced from an internal proxy.
What you still won’t see correctly updated is the Protocol request.getProtocol() reply which is still sourcing its value from the internal proxy. You should be aware of this and other potential misinformation if your web application uses the request parameters.
A work-around is to tell nginx to pass on values using additional x-custom headers and directly access these in your web application.
Append the following custom header to the location ~ \.jsp$ {} directive in the tomcat-proxy.conf configuration.
proxy_set_header X-Server-Proto $server_protocol;
Save, test and reload nginx.
sudo nginx -t
sudo nginx -s reload
Then update test.jsp to use the custom header value by replacing this line.
Protocol: <%= request.getProtocol() %><br>
With this.
Protocol: <%= request.getHeader("x-server-proto") %><br>
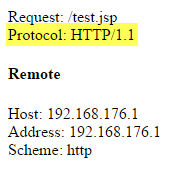
Reload /test.jsp in your browser and you should see that X-Protocol returns the protocol connection from the web browser.
You can use this proxy_set_header technique to pass on any nginx variables to your web application.
You could use this to pass on nginx’s local time.
proxy_set_header X-Server-Time $time_iso8601;
Or this to pass on nginx’s version.
proxy_set_header X-Server-Ver $nginx_version;
The naming conventions for the x-custom headers are left up to you.
All done!
I hope everything has worked as intended. If you found this guide useful please thumbs up this article at the top of this page or even share it on your own social media. Any comments or questions can be left below to which I will happily respond.
Congratulations you have reached the end of this extensive guide. I hope this article useful, and if so, why not buy me a coffee as a thankyou ? ☕
Written by Ben Garrett
