Run Ubuntu 16.04 on Windows 10 Creators Update
8 minutes
November 2017: This article is out of date, see the red box for links to revised articles.
Tip using Ko-fi or Buy Me a Coffee
Since the Anniversary Update, Windows 10 includes the ability for desktop users to install and run a copy of Ubuntu terminal within Windows! Known as the Windows subsystem for Linux or WSL for short it is available for any Windows 10 Pro/Enterprise system with the right updates.
If you are using Windows 10 1709 (Fall Creators Update) or newer, I wrote two updated guides Ubuntu Linux on Windows 10 how to and openSUSE Linux on Windows 10 how to.
I originally wrote an article here about the installation process, but that is outdated with the Creators Update, due to its usage of Ubuntu 16.04 as opposed to the earlier 14.04 release used in Anniversary. You can read about what is new to WSL in this great Microsoft Developer Network post from April 2017.
But largely beside the Ubuntu update, there is better compatibility with many mainstream tools, network connection enumeration (ifconfig, ping now works!), file change notification support, the ability to run Linux commands from Powershell/CMD and vice-versa, improved ANSI colour and mouse support!
Requirements
This guide assumes you have a decent understanding of the Linux terminal and Windows Command Prompt.
To install WSL with Ubuntu 16.04 you need Windows 10 64-bit 1703 or newer. You can check this by typing about in the taskbar search input which I will refer to as Cortana and select About your PC.
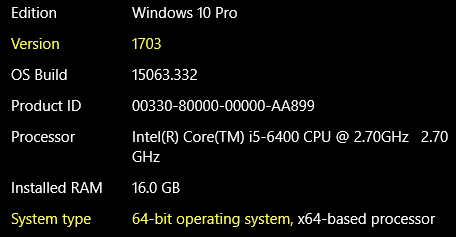
Install
In Cortana type and select For developers settings. In the dialogue under Use developer features check the Developer mode option.
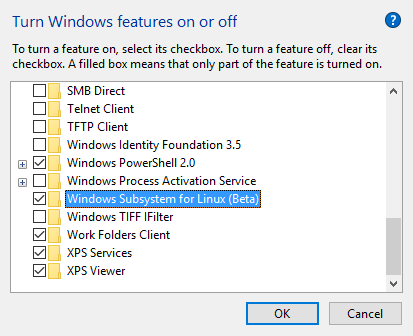
Now in Cortana type and select Turn Windows features on or off. Check the Windows Subsystem for Linux (Beta) and press Okay.
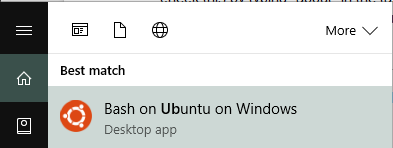
Once installed and completed type either Bash or Ubuntu into Cortana and select Bash on Ubuntu on Windows. You should have a local Ubuntu terminal running in Windows!
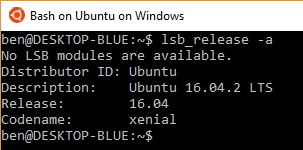
In the Ubuntu terminal type lsb_release -a and you will see its Linux distribution information.
ls -l will list the content of your active directory which happens to be your Ubuntu home directory.
You also have your scripting Linux terminal staples installed and ready to use.
Bash
$ bash --version

GNU bash, version 4.3.48(1)-release (x86_64-pc-linux-gnu)
Python
$ python3 -V

Python 3.5.2.
Perl
$ perl -v

This is perl 5, version 22, subversion 2 (v5.22.1) built for x86_64-linux-gnu-thread-multi
Bash in colour
Unlike the previous release of Ubuntu, 16.04 starts you with a barebones user account with limited colour and alias support. You can fix this with the following.
cp /etc/skel/.* ~
source ~/.bashrc ~/.profile ~/.bash_logout
You can edit .bashrc for more colour options and to add additional aliases.
Interacting with Windows and Ubuntu files
Ubuntu on Windows partition actually shares the NTFS directory structure used by Windows. This makes it accessible to Windows applications and also allows you to access your Windows files within Ubuntu.
Ubuntu on Windows root partition can be reached using the path below. This path can be used in Cortana, Windows File Explorer and the Command Prompt.
%localappdata%\Lxss\rootfs
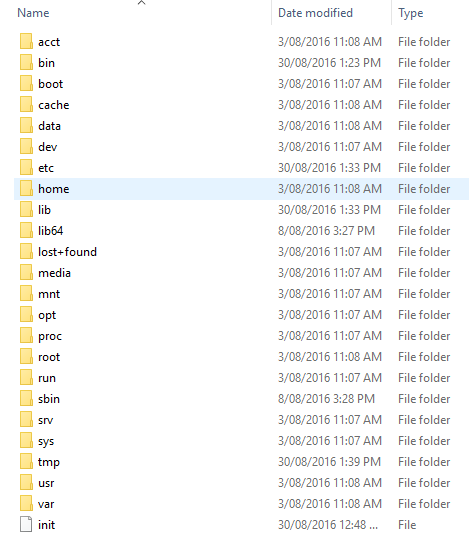
The \home subdirectory in rootfs, where you would expect your user account directory to be is empty. Rather the home partition can be found using this path.
%localappdata%\Lxss\home\%username%
And the root user account partition.
%localappdata%\Lxss\root
Conversely, you can also access your Windows drives within Ubuntu on Windows. They can be found in the /mnt directory. The following Ubuntu command lists the content of the Windows C: drive.
ll /mnt/c
Creating symlinks in Ubuntu to Windows directories
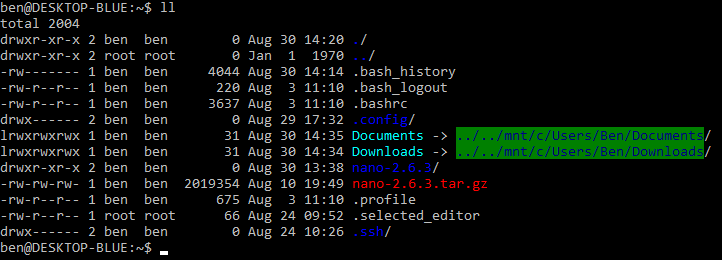
It’s easy enough to create symbolic links between your Windows and Ubuntu folders. You just need to make sure that any links you create within Ubuntu are relative symbolic links otherwise they will not work correctly.
Unfortunately, data found in environment variables are not shared between Windows and Ubuntu. In my Windows Command Prompt
echo %username% returns Ben and so my User account is located in C:\Users\Ben\.
In the Ubuntu terminal.
echo $USER returns ben but as Linux is case-sensitive the $USER result isn’t useful in this situation. So we will have to manually type the paths when creating the symlink.
Don’t forget to replace Ben in the path with your user account directory name using the correct case. While typing directory or file names tapping the Tab key on the keyboard will trigger Bash’s autocomplete function.
ln -sr /mnt/c/Users/Ben/Downloads ~/Downloads
ls ~/Documents
Now you can easily access and edit files in your Windows downloads and documents directories while in Ubuntu.
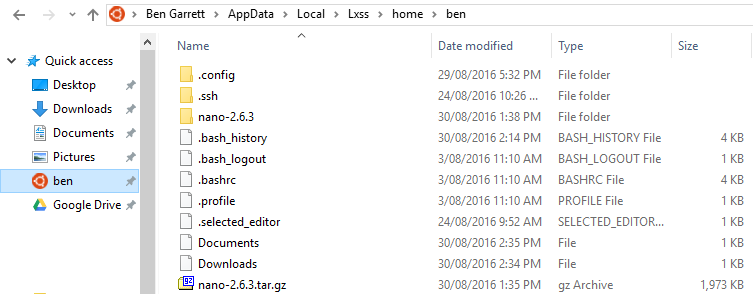
If you want to do the same while using the Windows Command Prompt. In an administrator Command Prompt the command below will create a link named Ubuntu in your User directory, it will point to the home directory used by Ubuntu.
$ mklink /d %homepath%\Ubuntu %localappdata%\Lxss\home\%username%

symbolic link created for \Users\Ben\Ubuntu <> C:\Users\Ben\AppData\Local\Lxss\home\Ben
Now list the Ubuntu home directory in the Command Prompt.
dir %homepath%\Ubuntu
You can then pin that symbolic link to the Quick access pane in File Explorer and even give it a Ubuntu icon located at %localappdata%\lxss\bash.ico.
Disabling the terminal bell
One thing I find very annoying is the Windows 10 terminal bell sound. As is often triggered after I tap the Tab key and the Bash autocomplete has too many or zero options. So let’s disable it.
sudo nano ~/.inputrc
Paste in the following.
# ~/.inputrc - See http://ss64.com/bash/syntax-inputrc.html for more options

# Do not bell on tab-completion
set bell-style none
# set bell-style visible
Save, exit, then close the Bash on Ubuntu terminal. Re-launch it and it should now remain silent!
Run a simple web server
In Ubuntu, you can quickly serve the current directory over the local web using Python. Here we will serve our user home directory.
cd ~
python3 -m http.server

Now in Cortana or in the address bar of your Windows web browser type localhost:8000

To quit Python’s Simple HTTP Server tap Ctrl+C together in Ubuntu.
Updating Bash on Ubuntu on Windows
Let’s update the Ubuntu distribution.
If you’re outside of the USA you may want to change the sources list that Ubuntu uses to check for and download updates from to somewhere geographically closer.
sudo nano -B /etc/apt/sources.list
deb http://archive.ubuntu.com/ubuntu xenial main restricted universe multiverse
deb http://archive.ubuntu.com/ubuntu xenial-updates main restricted universe multiverse
Change http://archive.ubuntu.com/ubuntu
To http://(country code).archive.ubuntu.com/ubuntu
So for me to use nearby Australian mirrors I switched the the links to the following.
deb http://au.archive.ubuntu.com/ubuntu xenial main restricted universe multiverse
deb http://au.archive.ubuntu.com/ubuntu xenial-updates main restricted universe multiverse
Note the http://security.ubuntu.com/ubuntu URL doesn’t offer any mirrors so it can be ignored.
Save and exit nano.

Now let’s update Ubuntu.
sudo apt-get -y update
sudo apt-get -y upgrade
sudo apt-get -y dist-upgrade
sudo apt-get -y autoremove
And you’re done.
Creating a Bash script in Ubuntu on Windows
We will create a simple Bash script to run the apt-get update and upgrade processes.
Ubuntu has a number of directories where you can create and store system-wide accessible scripts but I keep them in /usr/local/bin.
cd /usr/local/bin
sudo nano upgrade.sh
Paste in the following script, GitHub source.
#!/usr/bin/env bash
# /usr/local/bin/upgrade.sh
# Refreshes the APT repository applies any package upgrades.

sudo apt-get -y update
sudo apt-get -y upgrade
sudo apt-get -y dist-upgrade
sudo apt-get -y autoremove
Save and exit.
Make the script executable.
sudo chmod +x upgrade.sh
sudo ln -s upgrade.sh upgrade
ll

Now we can run the script from any location within terminal and those 4 apt-get commands should run in sequence.
cd /
sudo upgrade
Install a simple web server
It’s very easy to install and run a dedicated web server in Ubuntu on Windows.
$ sudo apt-get install lighttpd

$ sudo service lighttpd status
* lighttpd is not running

$ sudo service lighttpd start
* Starting web server lighttpd

$ sudo service lighttpd status
* lighttpd is running
Type http://localhost/ into Cortana or your web browser to view the Lighttpd Placeholder page.
Lighttpd web content is stored in /var/www/.
It’s configuration file can be viewed.
nano /etc/lighttpd/lighttpd.conf
It’s manual can be found at http://redmine.lighttpd.net/projects/lighttpd/wiki.
Note lighttpd will stop running when the Bash on Ubuntu on Windows terminal is closed.
If you prefer, other more widely used web servers are available such as Apache HTTP and Nginx.
sudo apt-get install apache2
sudo apt-get install nginx
Compiling Linux source code on Windows
I use nano as my go to text editor and the included version in Ubuntu is a bit out of date, so let’s update it. To do this we can download, compile and install the most recent nano source code onto our Ubuntu on Windows environment.
$ nano -V
nano, version 2.5.3
But first, we need to update our sources.list to allow apt-get access to the source code repositories. This should only ever have to be done once.
sudo nano /etc/apt/sources.list
Append the following to the bottom of the file.
deb-src http://archive.ubuntu.com/ubuntu/ trusty main
You may instead include a country code mirror such as this example for Australia.
deb-src http://au.archive.ubuntu.com/ubuntu/ trusty main
Save and exit then update.
sudo apt-get update
Remove the default nano install.
sudo apt-get remove nano
Install the packages we will need to compile our updated nano program.
sudo apt-get build-dep nano
sudo apt-get install libmagic-dev
Download and extract the nano source code. You can check for the latest source code gzipped version at the nano editor site.
cd ~
wget https://www.nano-editor.org/dist/v2.8/nano-2.8.4.tar.gz
tar -xf nano-2.8.4.tar.gz
cd nano-2.8.4
Now configure, compile the source code and then install the program.
./configure --enable-utf8
make
sudo make install
source ~/.bashrc
$ nano -V
nano, version 2.8.4

Brilliant you have just compiled GNU free software written for Linux on Windows 10!
Used and useful resources
Written by Ben Garrett
